Saturday, August 24, 2013

www.bonniedelicious.com


Hi, thanks for visiting. Bonnie delicious now has a new home. You'll find me at bonniedelicious.com. Come visit!
Kelly x

Sunday, August 18, 2013

Cashew & hazelnut fruit crumble


I've had a craving for apple crumble all week. It was one of my absolute favourite desserts when I was a kid and I haven't had it in ages.

Tonight was the perfect night for it. We shared a chaotic early dinner with baby Bonnie, then later once we'd put her to bed we enjoyed big bowls of dessert and relaxed. A lovely way to end the weekend.

I've given traditional apple crumble a healthy makeover. This one is gluten free and has no refined sugar. I used cashews, hazelnuts and oats to form the crumb. Dates and coconut oil bind it together. All the ingredients are thrown in the food processor so dessert comes together in no time.

We enjoyed ours with fresh cream but this could easily be kept dairy free by pairing it with your favourite dairy free ice cream. Enjoy! x


Cashew & hazelnut fruit crumble
2-3 cups cooked fruit (depending on your dish)
1/2 cup hazelnuts
1/2 cup cashews
1/4 cup of chopped dates
3/4 oats (use GF labelled oats if necessary)
1/4 cup coconut oil - melted
1/8 cup dessicated coconut
1/2 tsp cinnamon
1/2 tsp nutmeg

Preheat oven to 160 degrees

Place your cooked fruit into your baking dish.

Place all remaining ingredients into a food processor. Pulse until the texture is a course crumb.

Cover your fruit with the crumb mixture and place in oven.

Bake for approx 30 minutes or until golden brown. Watch carefully. The nut crumb can burn quickly.

Serve warm or cold.

(Vegan, gluten free, refined sugar free)


Tuesday, August 13, 2013

The BEST banana bread


Somewhere along the way I've gotten addicted to morning tea. I'm not sure when it happened but I've come to really look forward to a mid morning cup of tea and a sliced of something baked. And while I think terms like guilt-free are unhelpful, I do want to feel good about everything I put in my mouth. 

This moist, delicious banana bread is my morning tea constant. I've used almond flour and coconut to form the flour component and it's lightly sweetened with 2 ripe bananas and a couple of tablespoons of honey.

Gluten free baking like this loaf appeals to me because it's so nutrient dense. There's not loads of refined flour or unnecessary sugar. I notice the difference in how I feel when I eat this way and I'm quite happy to make it a daily treat. The added bonus is that baby Bonnie can enjoy some too. 

I've used honey to sweeten this but you could easily use dates or maple syrup instead. 


The BEST banana bread
2 Tbsp Honey or maple syrup / quarter cup dates 
2 very ripe bananas - mashed
2 1/2 cups almond flour
1 cup dessicated coconut
4 eggs
1 tsp baking powder
1 tsp apple cider vinegar
1 tsp vanilla essence
1/2 tsp nutmeg

Pre-heat oven to 150 degrees celsius

In a food processor add eggs, honey and vanilla. Mix until well combined.

Add the banana and combine.

Add the remainder of the ingredients and mix well.

Pour the batter into a loaf tin lined with baking paper.

Bake for 50-55 minutes until a skewer comes out clean when inserted.

Allow to almost entirely cool before slicing.

Enjoy as is or with a thick spread of butter.

(Gluten free, refined sugar free)


Wednesday, August 7, 2013

Red Sauerkraut


I've read two great books on fermentation in the last few months. They are: Real Food Fermentation by Alex Lewin and Wild Fermentation by Sandor Ellix Katz. Both books are really well written and got me super excited about starting some fermentation projects. I'm the kind of person who really enjoys the processes and transformations when preparing food so fermentation is my kind of fun.

My first project was kimchi and it was delicious. Next up I made some sauerkraut. I used all red cabbage so the end result is a pretty pink. That is the recipe I'm sharing today. I followed the instructions in Real Food Fermentation. It's a really straightforward recipe and doesn't require an expensive fermentation crock. You just need some clean jars. You can make it simply with just cabbage and salt as I have or add spices. Caraway, juniper or dill seed would all be fairly traditional.

Fermentation has been used for centuries as a method of preserving food. The process gives the end product probiotic properties that make it an excellent food for digestion. This is thanks to the naturally occurring presence of the Lactobacillus bactaria. Most store bought sauerkraut has been heat treated so will have lost this natural goodness. Homemade, raw sauerkraut is really easy to make, introduces healthy bacteria into your gut and is addictively tasty.

Follow the instructions below and you'll be experiencing the satisfaction of homemade lacto fermented sauerkraut in no time.

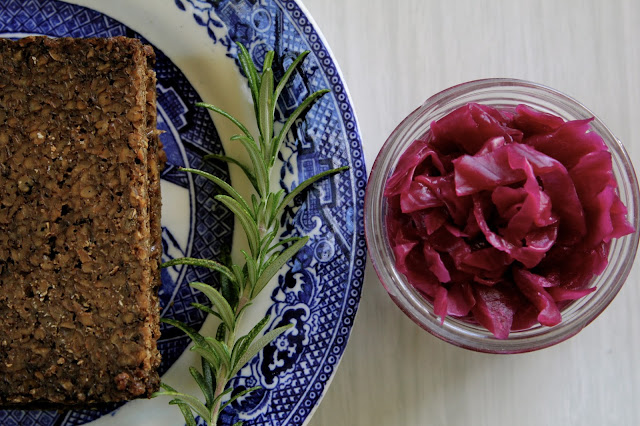
I served mine for lunch today with some some delicious goat gouda and lightly toasted pumpernickel.


Sauerkraut  - recipe adapted from Real Food Fermentation by Alex Lewin

900g sliced green or red cabbage -core and outer leaves removed (Thinly sliced cabbage will ferment       quicker and become softer. Thicker slices will retain crunch).
 4 teaspoons for sea salt (not iodised salt)

Place your cabbage in a really large bowl. Sprinkle with all the salt.

With clean hands, firmly massage the cabbage and work the salt through. You need to keep working the cabbage until it is pliable and you are able to squeeze liquid out. Depending on how fresh your cabbage is and how firmly you are massaging this could take about 6-10 minutes.

Pack the mixture into a large jar or several smaller jars*. Use a potato masher or a smaller jar to pack the cabbage really tightly so that all of it sits under the liquid and you've gotten rid of as many air bubbles as possible. Fermentation is an anaerobic activity. It's important that the cabbage come into contact with air as little as possible to avoid introducing stray bacteria that will spoil your sauerkraut. Ensure you leave about an inch (2.5cm) at the top between the cabbage and the lid of the jar as the cabbage will expand as it ferments.

Place the lid on the jar/s and place in a cool dark place. I leave mine in the pantry so I don't forget about  them.

Check your sauerkraut every day or so. Open the jar and taste it / smell it. Use a clean fork every time and firmly pack the cabbage back under the liquid. After a few days it should get bubbly. After a few more days it will start to smell and taste sour. Your sauerkraut will get more sour as time goes on. Once it's reached a point you are happy with place it in the fridge and start enjoying.

I've let most of my recent batches ferment for 14-16 days.

*I often use a few regular sized jam jars rather than 1 big one. I like to let some of the sauerkraut ferment for longer and enjoy some younger and crunchier.


Sunday, August 4, 2013

Barley risotto with honey & thyme roasted parsnips

The following recipe is inspired by the Meat Free Monday movement. A New Zealand branch has just been established and I'm really excited about it. In the last year we've cut down the amount of meat we eat to just a couple of times a week max. People choose to cut out or eat less meat for a variety of reasons. For me it's largely environmentally and health motivated. All of us eating meat heavy diets is not only bad for us healthwise, it's entirely unsustainable on a global level. 

Moving to (and enjoying) a more plant and wholegrains based diet starts with building up a repertoire of dishes that are relatively simple to make and totally delicious. 

My barley risotto with honey and thyme roasted parsnips is a nourishing midweek meal. Serve with some steamed green beans for a complete plate. You'll feel satisfied, body and mind.


Barley Risotto with Honey and Thyme Roasted Parsnips

Risotto
1 cup pearled or hulled barley (preferably soaked for 6 hours or overnight prior)
4 cups chicken or vegetable stock
1/2 cup white wine
1 onion finely diced
3 large cloves garlic finely chopped
Handful of parsley
3 sprigs thyme
Salt and pepper to taste
1 Tbsp butter (optional)
Olive oil

Honey & thyme roasted parsnips
3 large parsnips chopped into chunks
1 tablespoon honey 
Handful of thyme sprigs
Tbsp of rosemary leaves
2 Tbsp oil
sea salt 

Preheat oven to 180 degrees

Gently melt honey. Place parsnips, honey, thyme and oil in a large bowl and combine. Sprinkle with salt.

Place parsnips in oven and cook for approximately 25 or until golden and tender.

Heat 2 Tbsp of oil in a frypan on a medium heat. Gently fry garlic and onion until soft.

Add barley and 1 sprig of thyme. Stir.

Gently add 1/2 cup stock at a time to the pan (as you would for a rice risotto) stirring constantly. The barley will take 30-40 mins to cook.

Add parsley and 1 tbsp butter (or olive oil) and cook for a few minutes.

Serve the parsnips on top of the barley. Top with cracked black pepper and more chopped parsley if desired.

(vegetarian if vegetable stock used. Vegan if butter also omitted)

Lovely additions to the risotto would be:
1/4 cup grated parmesan cheese
1/4 cup of goat cheese crumbled over just before serving.
finely chopped kale or silverbeet added five minutes before end of cooking time.


Sunday, July 28, 2013

Beetroot, walnut & dill salad


Last night was the first of my winter dining events at Golden Dawn. It was glorious. Wonderful people, exquisite food and beautiful music. There was a cosy sense of community with guests happily sharing food and chatting with strangers. It looked and felt exactly as I'd pictured it in my head. I'll share some pictures at the end of this post.

Today I woke up feeling like I'm coming down with something. A sore throat and head-achey. The busy weekend might be catching up with me. I wanted something for lunch that would feel nourishing but still super tasty. A winter salad of beetroot, toasted cumin seeds, walnuts and dill was what I came up with. 

It came together really quickly and was delicious. I love dill and it's perfect in this salad but if you don't have any on hand, a big handful of parsley would work well.


Beetroot, dill & walnut salad
2 medium / large beetroot peeled and grated
1/4 cup of walnuts roughly chopped
handful dill chopped
1 tsp cumin seeds
2 tsp tahini
juice of one lemon
pinch of sea salt

Place your cumin seeds in a frying pan over a medium heat and lightly toast. They're done when they start to get fragrant.

Place your cumin seeds in a mortar and pestle and bash roughly.

Place all your ingredients (except a little of the dill) in a bowl and combine. Stir well to ensure all the salad is dressed evenly.

Sprinkle the remainder of the dill on top just before serving.

Serve immediately or will last 24 hours covered in the fridge.


Sunday, July 21, 2013

Tamarind, coconut & kale lentils


I try to always have a couple of portions of this dish in my freezer. It's super tasty, inexpensive and totally satisfying on a chilly night. I just recently discovered tamarind and it's added a lovely brightness to this recipe. The addition of kale (red Russian kale from our garden) makes this a complete meal. Leftovers are perfect for lunch.

It's essentially a dhal type recipe but I'm hesitant to call it that because I use the completely non Indian ingredient of hot smoked paprika. It may seem a little sacrilegious but I love the sweet heat and smokiness it adds.

Whenever I'm making this I think of a friend of mine who comes from a big Indian family of great cooks and just self published a beautiful book of her families recipes. I wonder if she'd approve of this dish. I plan to get brave and serve it to her one day soon.


Tamarind, coconut & kale lentils
2 cups brown lentils
6 cups vegetable or chicken stock
1 can coconut cream
1 can tinned tomatoes (preferably cherry tomatoes)
1 large bunch kale (or silverbeet) separated from stems and chopped.
Small handful of coriander chopped.
2 large onions chopped
2 tsp hot smoked paprika
1 Tbsp cumin
1 Tbsp turmeric
6 cloves garlic
1 1/2 Tbsp tamarind puree
3 Tbsp finely chopped ginger
1 large red chill (deseeded)
2 Tbsp coconut oil or ghee


Chop the onions. I like to cut the onions in half and thinly slice into half circles (rather than dicing) to add a little texture to the dish.

Melt the coconut oil in a large heavy based pot on a medium heat. Gently fry the onions, garlic, ginger and chilli.

Add all the spices and cook gently until fragrant.

Add the lentils and stock. Bring to the boil and leave for five minutes. Add the tamarind puree. Turn the stove down to a simmer and let it bubble away for approx 1/2 hour. Stir regularly.

Add the tin of tomatoes and leave to simmer for another 1/2 hour. Stir regularly. If the pot is looking too dry during this time, add a 1/2 - 1 1/2 cup of water.

Use a masher to break up some of the lentils and provide a kind of gravy. Do this until the dish has reach a desired consistency. About 30 seconds of mashing usually gets it to where I like it.

Add the can of coconut cream and the kale. Simmer for 10 minutes.

Taste to check seasoning and add salt / pepper if desired. Stir through coriander.

Serve on top of brown rice with a dollop of greek yogurt on top.

(vegetarian if using vegetable stock, gluten free)